Tuesday 11 July 2017

Seriously?


Seriously? is my new short animation. Working in my favorite theme sci-fi it's set on a giant alien spaceship and shows the interaction of two of the inhabitants. There is love in the air....and on the floor and in your face. I asked my daughter for an idea for a short, she gave me nothing for hours saying she was thinking and then came up with a two sentence idea and Seriously? was the result.

Why so serious? ......BECAUSE!


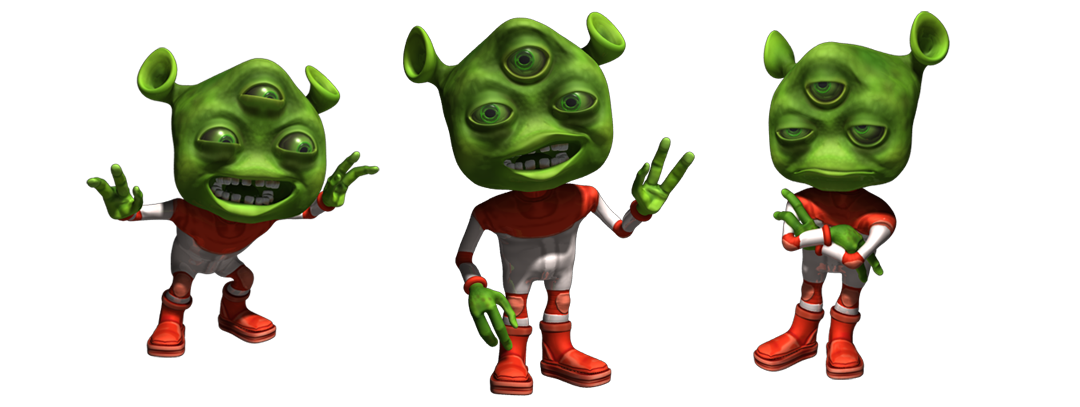
My first job was to build a new character, My little green man #1. I wanted to do something cartoony and cute with appeal and simplicity. It took me a couple of tries as my first version was ugly, I like to sculpt my characters with lots of detail but it turned out that less was more. Simple rounded shapes made the character look cuter.
That's what I call UV mapping SERIOUSLY!
Surface of the model laid out for painting
Maya base mesh to Zbrush sculpt to render
Maya base model to Zbrush to texture test


That's a serious pose there....
Serious pose done in Maya rendered with 3Delight

My next job was to create an animatic. An animatic is a very rough version of the film where you can see the intended actions and camera shots but animation is very basic, just enough to show what happens.


So once you have your animatic it's basically a case of refining until you have your final animation version. You can see that while I was animating I had a placeholder background. I put the final version of the background in after the animation was done. Next I will show you an early version of the animation.


In that version you can see the animation is quite rough, some of the last shots look very different in the final version. There is no sound, the sound was worked on by my good friend Rafa Tomás Velázquez who was my house mate in Dublin. He is a talented guy and you can see more of his work over at Farmode .

Once I had finished the animation the last step was rendering I used 3Delight for the final render but I also tried Mental Ray and Renderman.


Seriously rendered with Renderman
Renderman as used by Pixar........not really working for me :(

Seriously rendered with mental Ray
Mental Ray looked very nice but .....wasn't free :(

Seriously Title
3Delight saves the day 


Rendering was a headache, I set up all my lights with and did all my tests with 3Delight, it kept crashing on me but I thought it should be all right when I rendered a full sequence a batch render........it wasn't. This lead me to try the other two, Mental Ray is what I have most experience with but at first it wasn't running. After poking around on the internet I found a solution and got it working and it looked great...........but I didn't realize you had to pay if you want it to batch render. You can render stills but to render a sequence you have to buy it. 

Renderman to the rescue! Pixar use it it must be amazing!...........WADDAYA MEAN IT TAKES 10 MINUTES TO RENDER A FRAME!!! Erm....yeah so seems my laptop is not Pixar ready, I could only get very ugly results with my background in Renderman. Back to the drawing board. Luckily in picking through my scene so many times to set it up for the different rendering programs I discovered my camera was corrupt. This was what was causing 3Delight to crash and after that everything went smoothly.
It would be great if people could share this post and the film, I would love Seriously? to get a big audience.

Be seeing you! Seriously!
Be seeing you!

Friday 27 November 2015

Shotgun 3d model

Shotgun Pump Action

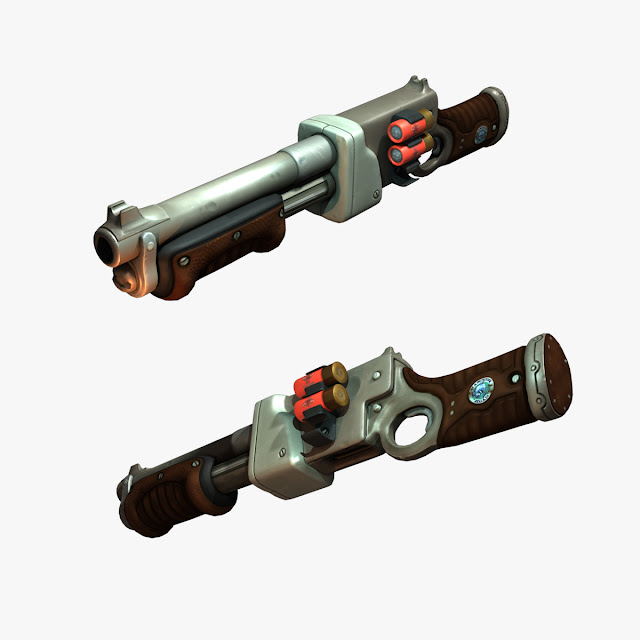
Here is my new Pump Action Shotgun model available from Turbosquid now. You can get it for Maya, Max, in fbx, or obj format. It's a polygonal model coming in at  faces 7519  verts 7485 for the shotgun with three cartridge models included. If you go over to turbosquid you can see a little animation of the shotgun pump action firing and ejecting shells.


I'm going to talk here a little about how I built the model and converting it from Maya to Max.
Shotgun base mesh in Maya
Maya Low poly shotgun
 I started out with a low poly base mesh which I built in Maya I then UV mapped the low poly model. I decided to have a look around to see if I could find a better UV mapping solution for this model. I normally make organic models and have been using Zbrushes UV master but it's no good for mechanical stuff like the shotgun. I ended up using Roadkill, it's a good program for low polygon. I also tried Maya's unfold but found it to be so loaded with bugs that it was unworkable.

Roadkill shotgun UV mapped showing UV islands
Shotgun in Roadkill for UV mapping

Once this was done I exported the model as an obj and brought it into Zbrush for detailing. I separated the model into a number of subtools so that I could get a higher level of detail into the model.


Base model in Zbrush
Below are my high poly Zbrush sculpts with a shiny material on them so they look pretty. I found it quite hard to sculpt a mechanical object like this, but the idea was to push myself specifically into a hard surface object and I learnt a lot from it.


The next step for me was to get normal maps from the high poly sculpt onto a lower poly version of the shotgun. For this step I used xNormal which I have been using for a while and for me it seems the most reliable tool for this. As I had a number of subtools and because some areas of the shotgun overlap I used my subtools to normal map the shotgun in sections that fit into one texture page when assembled (if you look at the Roadkill screen shot you can see my texture page). Overlapping objects in normal mapping will cause errors if not dealt with separately.

This is where things went wrong..................
I had some ugly texture stretching going on which you can see above. The strange saw tooth effect showing on the piece above is pixelation on a normal map. What I did to fix this was re-map the shotgun at a higher poly division and also I altered my UV islands. I also rebuilt the barrel and used edge creasing in Zbrush to keep my edges sharp. The rifle butt needed re sculpting as I didn't have enough geometry in my low poly to make my original version work. All useful things to learn, edge creasing in Zbrush is an easy way to keep your crisp edges. For mechanical objects it's better to be generous with your low poly when it comes to curved areas like the rifle barrel. I discovered that Roadkill does not cope with higher poly models and ended up mapping the shotgun in sections, it wasn't too bad, I used the subtool division from Zbrush.


Next step texturng. Above is an early base colour version. You can see the barrel has changed from the Zbrush version. Below is the altered mapping from the higher poly division shotgun.

One more thing I wanted to share, as it drove me up the wall. This is the first model that I have converted to Max. It's pretty simple for a model like this which is just geometry with some separate parts. I exported the model as an obj. I learnt that to keep my pivot points accurate I needed to export all elements from the origin. I learnt how to rebuild my materials in Max, all pretty straight forward........until normal map seams!

The horror!

I'm going to run through what happened and how I solved it starting with setting up the normal map slot in the material. The first step is to go to the maps section of the material. Set the bump map amount to 100, default is 30. Next click the map button marked none, select "Normal Bump" from the Material/Map Browser. Now select the normal texture node.
Normal Map set up in Max help images for setting up your normal map texture file
Select the Normal slot marked none and pick bitmap from the Material/Map Browser. Lastly and here is the fix. Once you have navigated to your normal map texture file go to the gamma option, select override and set it to 1 as shown in the image below. The problem is due to Max's default gamma option being set to 2 which gives you your seams.
Max gamma fix for normal map seams which options to use
I had to do lots of googeling to get to the bottom of that one, so I hope this will help others with there normal map woes. Typical Max that the default value doesn't work.
Fixed!
I could also tell you a thing or three about shotgun calibre, imperial to metric but I think it might be too exciting for you (sarcasm).

Shotgun pump actionShotgun Wireframe

Thursday 18 December 2014

My Illustrated Children's Book about Autism 'Why does Sammy do that?'

Why Does Sammy Do That? cover illustration
Cover illustration
This is my first self published illustrated children's book. It explains the problems a child with autism can face.  My partner Melanie Janz wrote it and I have been working on the illustrations. The story is about our son Sammy to help his class mates and other children better understand autism and Sammy's behaviour. The book is called 'Why Does Sammy Do That?'.

Why Does Sammy Do That? Interior illustrations proprioceptio
A couple of pages from the interior dealing with proprioception:  the perception of movement and spatial orientation

Sammy was diagnosed with Autism Spectrum Disorder (ASD) when he was four years old. ASD made sense of much of why Sammy was different from other children, and in some ways it was a relief. Once we had been given some insight into why Sammy behaved the way he did, we found ourselves explaining what autism was to others. We did find that it was difficult to explain to other children of Sammy's age (also older and younger), but that they were often the most direct about asking "Why does Sammy do that?".

Melanie had the idea for a story, which would simply explain some of Sammy's behaviour to his class mates, particularly issues with sensory perception. She came up with it, while she was stuck in bad traffic. Her plan was to put it together with photos and print a couple of copies for Sammy's school and maybe our daughter Becky's pre-school. I suggested I could illustrate it and was also thinking about self publishing. I have published my cg models through online shops before so I thought a book would be more straight forward. Illustrating a children's book is something I've daydreamed about for years. I did a style test, a simple illustration of Sammy looking lost, and Mel was keen for me to do the project.


Why Does Sammy Do That? style test
Style test for Why Does Sammy Do That?
We were influenced by Ellen Notbohm's book Ten Things Every Child With Autism Wishes You Knew which we both found very useful and inspiring. I started working on the book in mid July, and we published it on the 12 of December 2014. The illustrations were finished by the end of October. November was taken up with bug fixing, proofing and tidying up loose ends. My father proof read the book for us with his years of experience marking students working as an English teacher.

Why Does Sammy Do That? trampoline girls


 It has been a very different project to what I'm used to. It's very close to my heart and was extremely hard to work on at times. With many illustrations of my son and some of my daughter it was personal. The book often deals with scenes I find very difficult and upsetting. It's hard for me to see people judge Sammy without understanding him, but at the same time understandable. If I didn't know Sammy, as an outsider I might see Sammy the same way.

For the illustration I worked in Photoshop. I worked up the lines quite roughly and tightened them over time. The color is quite simply blocked in with a shadow and highlights pass. The color is layered under the line work similar to cell paint in traditional animation. You can see in the style test that I was thinking of a more loose finish, but when it came to the book I tightened it up. The format for the book is 8.5"x 8.5" at 300 DPI I created the originals at 10x10 and shrank them down for the final version. I had a palette layer that I passed from file to file to keep my colors consistent.

Why Does Sammy Do That? WIP group Hug
Work in progress on one of the illustrations for Why Does Sammy Do That?


Why Does Sammy Do That? group Hug


 We used Createspace for this project. It was relatively straight forward to work with, there was a hiccup with the resolution being too low. I unfortunately didn't spot the problem until we had a printed proof.  This went round in circles for a bit until I asked on the site forum and was told by other users to re- upload the file, which magically solved the problem. I used photoshop and uploaded the final print files in PDF format. I would probably use createspace again, but it seems if you get stuck, the forums where you can talk to the other users are the best way to go.


The pictures in the book are mostly children we know. The most obvious is our son Sammy, but my daughter Becky also pops up in a number of the illustrations as do our neighbors, a cousin, various children from Sammy's school and our cat Ember.
Why Does Sammy Do That? Becky & cousin
Becky & cousin, interior illustration

We have had wonderful feedback about this book from friends and family, the other parents from Sammy's school and also the teachers and support workers who work with Sammy.

"I love this book. A perfect book to explain autism to children. It made me cry."

"This is a must-have for anyone who wants to help their children understand the world and mind of an autistic child. Beautifully written and illustrated, and very moving."

Why Does Sammy Do That? Sammy smiling
It's now available on Amazon in the UK Why Does Sammy Do That?
Also in the US Why Does Sammy Do That?

Please can you share plus and like to help us increase the awareness of autism!

Thanks to everyone who has supported us with this project!
Related Posts Plugin for WordPress, Blogger...